
This project was originally published on Make: Projects.
Use your origami skills to fold a “paper balloon.” Then add a battery, LED, and binder clip as a switch to transform your creation into a simple lamp. This easy circuit project is a great way to explore switches. Plus, there is considerable room for self-expression as you color your paper and lamp.
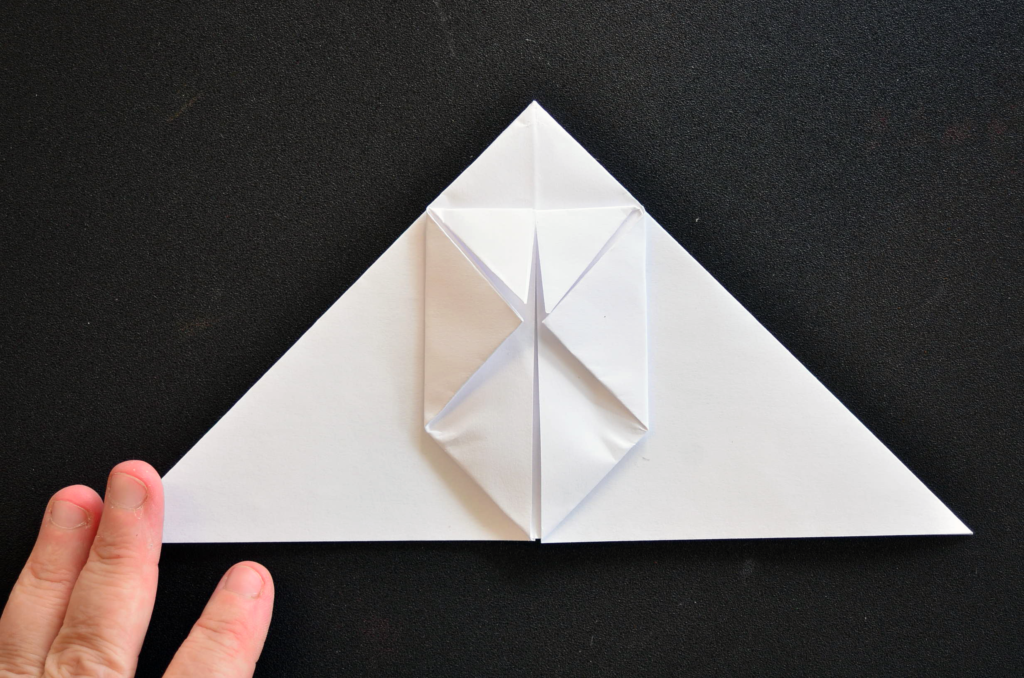
Also it kind of looks like a bacteriophage to me, so shout to my biology peeps.

What You’ll Need
- 1 piece of copy paper, any color
- 1 CD/DVD
- 1 10mm LED (a “gumdrop” LED), 3V, any color
- 1 coin battery, 3V, CR2032 or CR 2025
- Maker Tape or ¼-inch copper tape with conductive adhesive
- Small binder clip
- Scissors
- Invisible tape (optional)
- Permanent markers (optional)
All of these materials are available as part of the Make: Origami Paper Circuits Kit with the exception of the paper and CD.

First Folds: Cut the copy paper into a square 8 1/2″ by 8 1/2″. Orient the paper as a square in front of you. Fold the top down to meet the bottom edge. Then fold the right edge to meet the left edge.


Into a Triangle: Lift the bottom left corner and pull up towards the top center. Swing the flap out and fold down to create a triangle. Flip the model over and repeat on the other side.


Create Pockets: Fold each of the outside corners up to the top point and crease well. Fold the newly created points into the center and crease well.


Fold Into Shape: Fold the top corners down to form small flaps. Gently lift the pockets you made previously. Slide the flaps into the pockets you created. Flip the model and repeat on the other side. You should have a hexagon shape when completed.


Blow Up the Balloon: Gently blow air into the hole at the bottom of the model to inflate the paper balloon. This is the best part!
Add the LED: The LED has one long lead and one short. The long lead is the positive lead. The short is the negative. You may want to mark the positive lead with permanent marker so you remember which is which. It is important to know which lead is which when you wire the lamp.
Gently pull the leads apart, flattening them against the bulb of the LED. Gently push the bulb of the LED into the hole of the balloon.


Wire the Leads: Place a piece of maker tape over the negative lead that reaches to about halfway across the CD. Then place a piece of maker tape over the positive lead that reaches to the end of the CD and overlaps a bit. Fold the tape under the CD.


Attach the Battery: Fold a small loop of maker tape so that the adhesive is facing outwards. Place this at the end of the line of maker tape coming from negative lead.
The battery has a positive and a negative side. The positive side is smooth and have a plus sign (+) on it. The negative side is bumpy and has not marking. Place the battery negative (bumpy) side down on the loop of tape. Press down to attach it well.
Place another piece of maker tape on the top of the battery and run it to the edge of the CD. Overlap it over the edge. Make sure that the maker tape from the positive and negative leads do not touch, but end near enough to each other that a binder clip can connect them.
Add the Switch: Apply a small piece of the maker tape inside the binder clip, along the top. Clip the binder clip to the CD so that the maker tape inside the clip connects with the maker tape from the positive and negative leads. Your lamp should light up!


Next Steps: If desired, make invisible tape to form loops, with the adhesive facing out, and use them to more securely attach the paper balloon to the CD. Decorate the CD with permanent markers.
For more fun check out my Maker Camp Live video above with this project and others. Or check out The Big Book of Maker Camp Projects for over 100 other fun activities from crafting to coding.